Tuesday, May 25, 2010

An Anchor Project

Spring Weather


The teak sports a shine again, coat #7, but the weather has really slowed down progress. At noon today it was 55 F in the shed and the outside humidity was 98%. Varnish just doesn’t want to flow or dry in those conditions. When it is chilly and damp you can forget about two coats a day, instead it’s more like one coat every two or three days. Warmer, drier weather is predicted for the end of the week. It’s Spring, it’s the Northwest, it happens. So it's time for some other projects on the To-Do list.

Chain Check Time

Rhapsody carries 400 feet of 3/8 inch chain on the main anchor. That’s usually adequate for our typical Alaskan anchorages, allowing a comfortable 3:1 to 5:1 scope in depths up to 80 feet. In deeper water or during a storm it would be nice to have more chain available, just in case. The Capt. hauled all 400 feet of chain out of the lower chain locker for routine inspection and thought about lengthening it, and possibly modifying the chain locker to handle the extra footage, etc. 


Both anchors are currently resting on the boat shed floor, and major portions of the chains have moved from chain locker to shed floor, to boat deck, back to chain locker and back again to deck… you get the picture.

He had also pulled the 100 feet of chain and 250 feet of line for the auxiliary anchor out of the upper chain locker. Since we’re in the shed without benefit of the hydraulic winch, that’s a whole lot of pulling.


The 250 feet length of anchor line soaked in a bleach solution for a day, was rinsed and is now looped and drying over the stair rail. It looks like new (it should, since we never use it) and smells pretty good too.


Rain pants, fishing pants, work pants too.

The anchor rode may look good, but the chain locker is a different story. Seawater and miscellaneous organic matter end up being stored with the chain, despite its receiving a fresh water washdown before it reaches the chainpipe. There’s some stinky stuff in that space, until the chain locker is cleaned up. (Thank you Capt. for handling that job solo!) 

The Capt. spent a lot of time in the upper chain locker.

     Above: the bitter end of the auxiliary anchor rode, tied off securely. 

Coming soon: the final coats of AwlSpar Varnish, bottom paint and a modification solution for the chain lockers.


Sunday, May 23, 2010

Classy Cushions


Dave T. of Class A Interiors has crafted classy upholstery for our pilothouse settee. The old unit, covered in powder blue faux suede, had come to the end of its days. Worn, nubby and shredding in spots there was no question the fabric needed replacing. It was also time to rethink the color scheme.
The color shown in the photos barely hints at the rich, buttery warmth of a hue somewhere between cream and butterscotch. It complements the feature strips in the teak and holly flooring, and makes both the table and the cherry wall paneling look especially rich in tone.


What an improvement (and it's finished!)

Roughing It


The teak now holds five coats of spar varnish, and is  no, was beginning to look pretty good. Then Dave brought out the flat sander. Goodbye shine! I hear it’s the approved way to knock down any uneveness, get rid of dust bubbles, and add a little “grab” for the next coat. It feels really, really smooth but it certainly doesn’t look pretty any longer. Only five more coats to go.

Saturday, May 22, 2010

Putting on the Shine


We did spend a lot of days watching wood dry, and now we’ve moved on to watching varnish dry. Don’t laugh, we’re talking progress here. Today Wood Wizard Dave applied the fifth coat of varnish - only five more to go. In warm, dry weather it’s possible to apply two coats a day, but cool temperatures have slowed drying time and limited us to only one coat per day. Except for the days when the winds are so blustery they stir up the yard dust and blow it under the shed walls and through the vents. Then Dave applies zero coats per day. Dust is not recommended when you varnish, so we wait. 
Teak boards can range in color, from light honey to deep brown. The patterns on an individual board might vary from a tight grain to a wide spaced zebra-like striping. It’s an exacting art to blend color-matched tints, and then apply them with a fine brush to improve on nature’s graining, or even disguise light-colored caulk or filler lines. This calls for a good eye and steady hand.


It’s going to be so pretty!


Saturday, May 15, 2010

The Teak Project

Scraping, Shaping and Sanding

Our move into the shed marked the beginning of the BIG boat project, refinishing the ten-inch wide teak caprail. This feature is a beautiful accent to the classic lines of the boat and her sweeping bow… but only when the finish looks new. Right now, after five years, it needs help.


Railings and fittings were removed. Fiberglas surfaces, ladders, fill pipes, etc. were protected by tape and rolls of corrugated cardboard.


Dave and Ian, a  team of father and son woodworkers extraordinaire, spent ten days removing the old finish and caulking. They were aided by a heat gun, some specialized tools, years of experience and tons of patient perserverence. 


They sanded, fine-tuned the edge shaping and sanded some more. Ribbons of old finish littered the decks and the shed floor and a fine powder of sawdust drifted all over the place. 


The Capt’s contact allergy to teak sawdust is a constant challenge, so he worked on a number of inside projects this week. 

Removing the old finish didn’t end the preliminary work. Oh no, we had to wait for the wood to dry to a moisture content of 12% or lower. Most of the caprail dried readily to 8% or below, except for a few spots under some deck-railing fittings. These few areas stubbornly hovered around 18% for days. 


The moisture meter has two electrodes that press into the wood and measure the electrical resistance (or is it current?) passing between them, then report out a moisture percentage.


So a blower keeps the air moving over these spots, and we wait, and wait... and I'll keep working on my patience.


The next step, any day now, will be to wipe on a 50/50 solution of finish and thinner and sand it to fill in the grain. Using sample color chips to preselect the best choice for the grain filler calls for considerable color matching skills, and will ultimately depend on Dave’s eye and artistry, along with input from the Capt. 


Sunday, May 9, 2010

The Haul Out


May 5
Any Cinco de Mayo festivities shared the day with our celebration of hauling the boat out at Ocean Pacific Boatyard. OP is located in Discovery Harbour, not far from the Discovery Harbour Marina. But our slip at the marina seems a world away from here now that we’re sitting up on the hard, inside a shed, out of the weather, even out of sight of the saltwater.

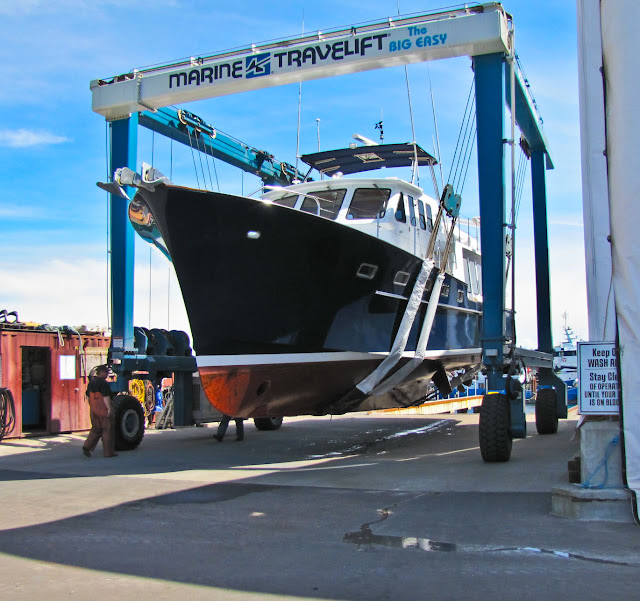
The torrential rains and occasional gale force winds of the past week played havoc with the yard’s schedule. The rain slowed down any outside painting projects and the high winds postponed any TraveLift movements, so no boats were launched or lifted out. No fault, no blame when schedules slide - but I still have to work on developing patience. Grass can’t grow fast enough, boat projects can’t happen soon enough… and my patience is still a work in progress.

The lift went smoothly, purely routine with no surprises and no excitement. That’s always a good thing during a haulout.. 


After the lift a pressure wash of the bottom removed some fuzzy, green organic growth at the waterline and a little scraping took care of the colonies of baby barnacles developing inside some thru-hull inlets and outlets. 


The bottom paint looked pretty good, as did most of the zincs, but we’ll redo everything just because it’s a good idea. (Actually WE won't, but OP will.) The BIG project will be refinishing the exterior teak on a wide caprail; thus the move inside a shed to minimize moisture and dust contamination. 

A steel-hulled fishing boat was in the shed ahead of us, finishing up an exterior paint job. New paint made that old hull look pretty good.


After the fishboat was moved out into the yard, the shed was washed down and readied for Rhapsody's arrival.


Moving Rhapsody inside the shed proved to be an interesting exercise in skill and caution; Gilbert used walk-around wireless controls and handled the Travelift with precision.


It was a close fit heightwise that required dropping the large antennas (antennae?) and snuggling the dinghy’s lifting gear up tight against the back wall.


Even then the anchors and a bit of the bow thrust out beyond the forward wall. Now what?


No problemo - it's been dealt with before and OP had a solution underway almost immediately. Boomer manned the Z-lift and managed attaching and fitting an extension.


While still suspended in the Travelift slings, Rhapsody was gently lowered... slowly... inch by inch... onto wooden beams; then metal support stands were fitted all around the hull. Jeff used retention chains, passing under the hull, to secure each pair of stands.


Wide access stairs were installed fore and aft... a lot easier to negotiate than a standard ladder.


The end panels received a final adjustment and we were inside and closed in. Ready for action, ole!